고객지원
How to update BIOS/BMC firmware under OpenBMC?
Steps to update BIOS/BMC firmware via OpenBMC
Login page
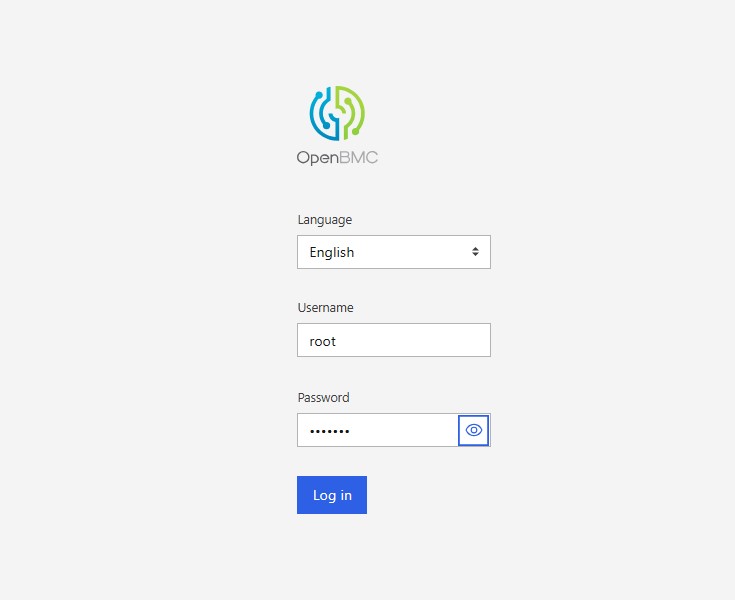
Default Username: root | Password: 0penBmc
BIOS/BMC Firmware Update
- [Operations] -> [Firmware]
This wizard will guide you through the firmware upgrade process.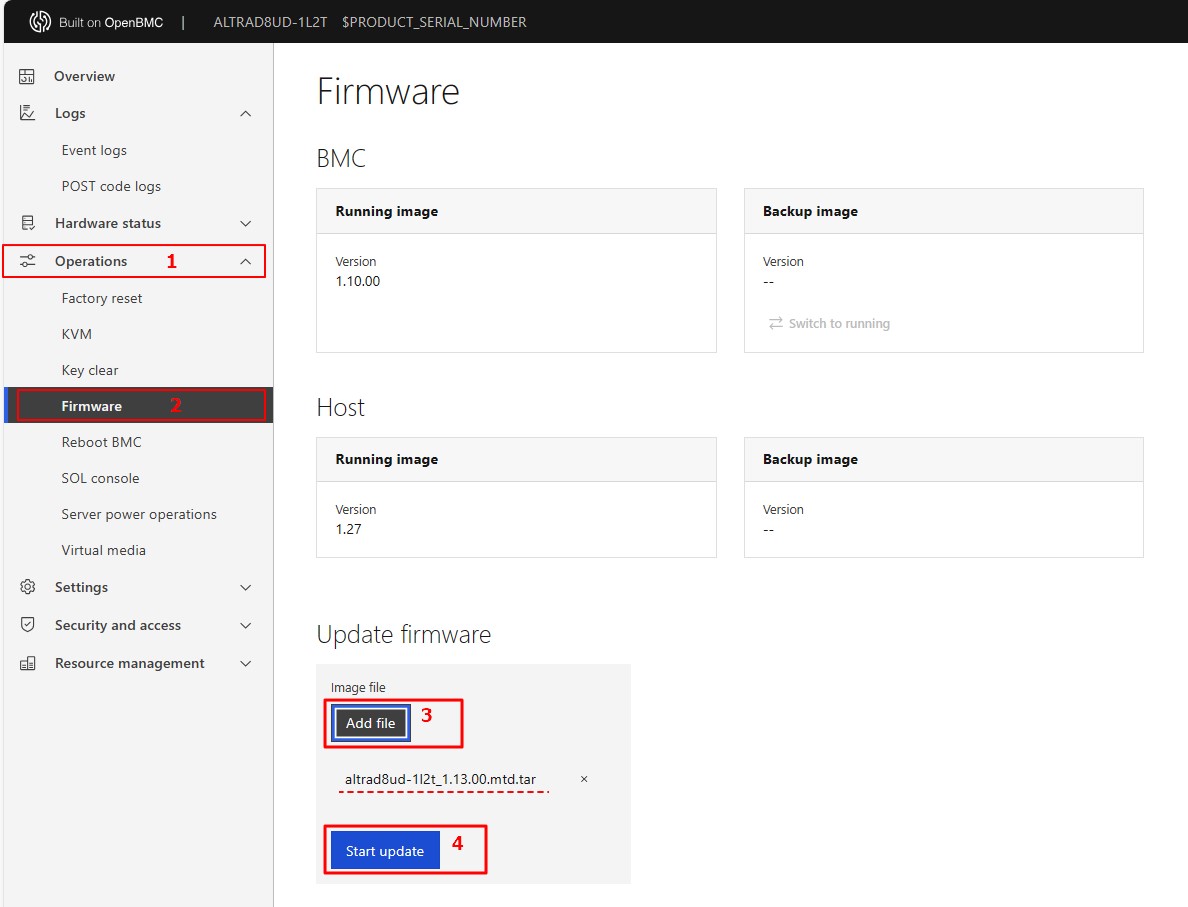
- Click “Add file” to select the BIOS/BMC FW file. Then click “Start update” for the upgrade process.
- Click “Start update” to continue the BIOS/BMC FW upgrade process.
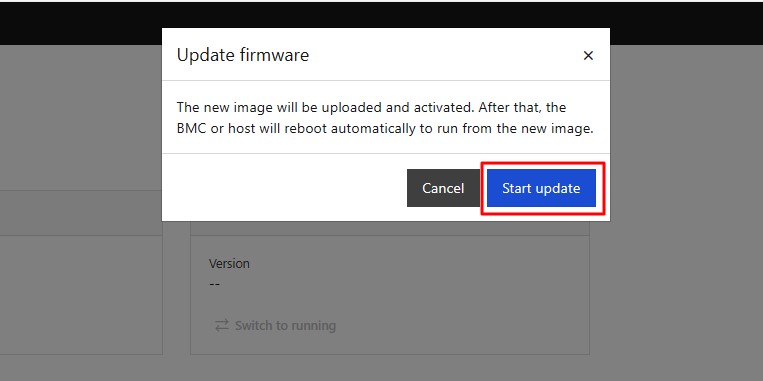
- The BIOS/BMC FW upgrade is being processed, please wait for a few minutes.
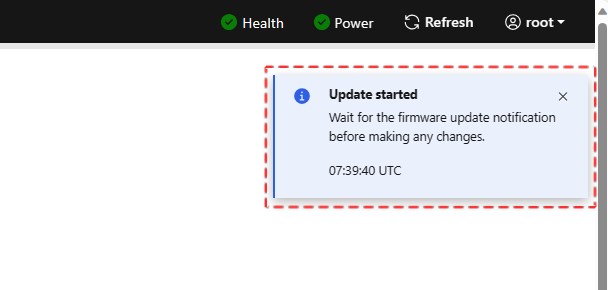
- BIOS/BMC FW upgrade is completed. Click "Refresh" and restart the system.
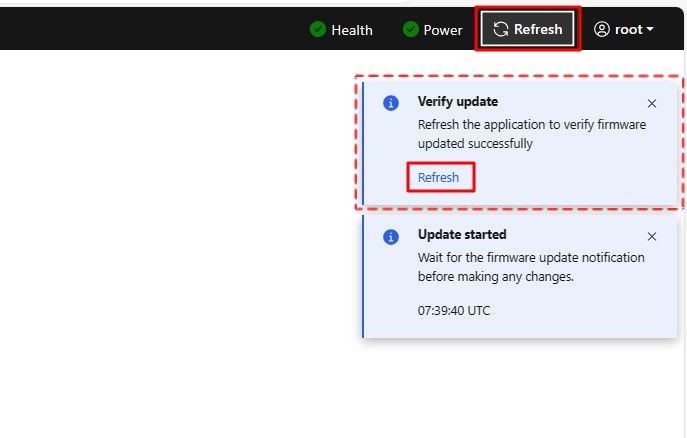
- Remark:
Clear the browser cookies after the BIOS/BMC FW upgrade is completed.

RedFish Commands to Update Firmware for Your Server Systems
This guide features the cURL commands to update BIOS and BMC firmware for your server system which supports RedFish. Before we start, please make sure your host system has an IPMI or NC-SI LAN port connected to the internet and the BMC IP address of it for a client end in the same network segment to access.
1. BIOS Update:
curl -k -v -X POST https://[IP_address]/redfish/v1/UpdateService/upload --form 'UpdateFile=@[File_location]' --form 'UpdateParameters={"Targets":["/redfish/v1/UpdateService/FirmwareInventory/BIOS"]};type=application/json' --form 'OemParameters={"ImageType":"BIOS", "Config": 4, "Action": 3};type=application/json' -u [username]:[password] -H If-None-Match:W/\"1667287258\" -H "Expect:"
*We recommend this command which shuts down the host immediately and perform BIOS update.
For BIOS update, here are the definitions to the available values for "config" and "action":
'OemParameters={"ImageType":"BIOS", “Config”: config, “Action”: action}’
config
2: Preserve BIOS settings
4: Overwrite BIOS settings
action
1: Update on host shutdown
2: Update immediately without changing host state
3: Shutdown host to update
If the update request is successfully sent off, the system would return an Accepted message with a 2xx code: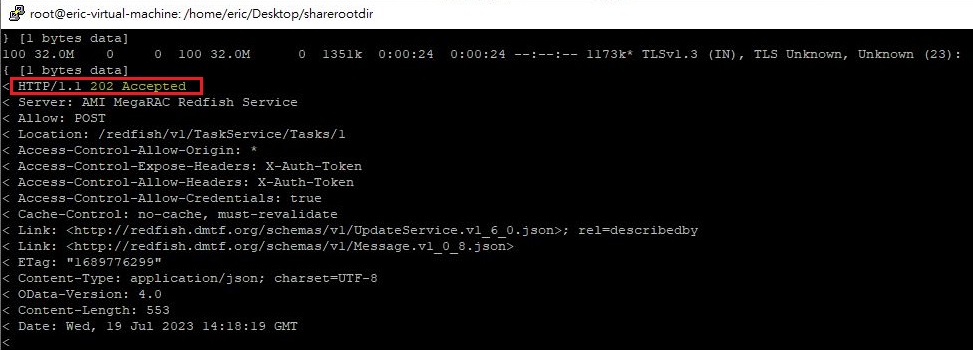
You may also check the update progress by visiting:
https://[host_IP_addr]/redfish/v1/UpdateService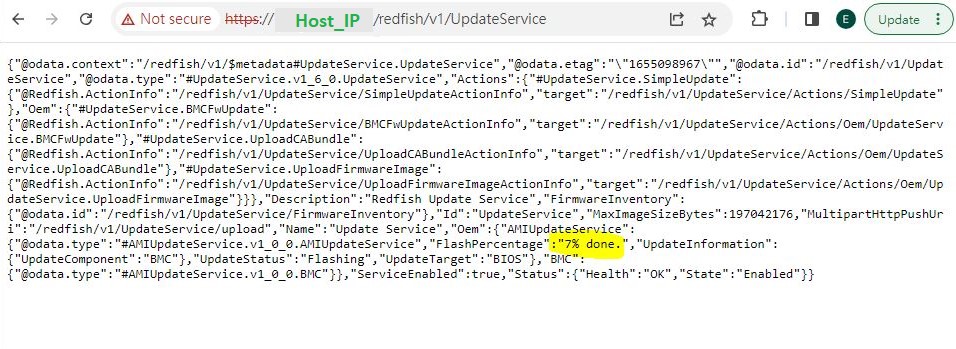
2. BMC Update:
curl -k -v -X POST https://[IP_address]/redfish/v1/UpdateService/upload --form 'UpdateFile=@[File_location] ' --form 'UpdateParameters={"Targets":["/redfish/v1/UpdateService/FirmwareInventory/BMC"]};type=application/json' --form 'OemParameters={"ImageType":"BMC"};type=application/json' -u [username]:[password] -H If-None-Match:W/\"1667287258\" -H "Expect:"
If the update request is successfully sent off, the system would return an Accepted message with a 2xx code as well.
3. Reboot Host:
In case you are not using a shutdown action parameter (3) for the BIOS update command, or to view the latest firmware information of your current host after the update, please reboot your host with the following command:
curl -k -v -X POST https://[BMC_IP]/redfish/v1/Systems/Self/Actions/ComputerSystem.Reset -d '{"ResetType" : "GracefulRestart"} -H "Content-Type: application/json" -H "X-Auth-Token: [token]"
4. Troubleshooting:
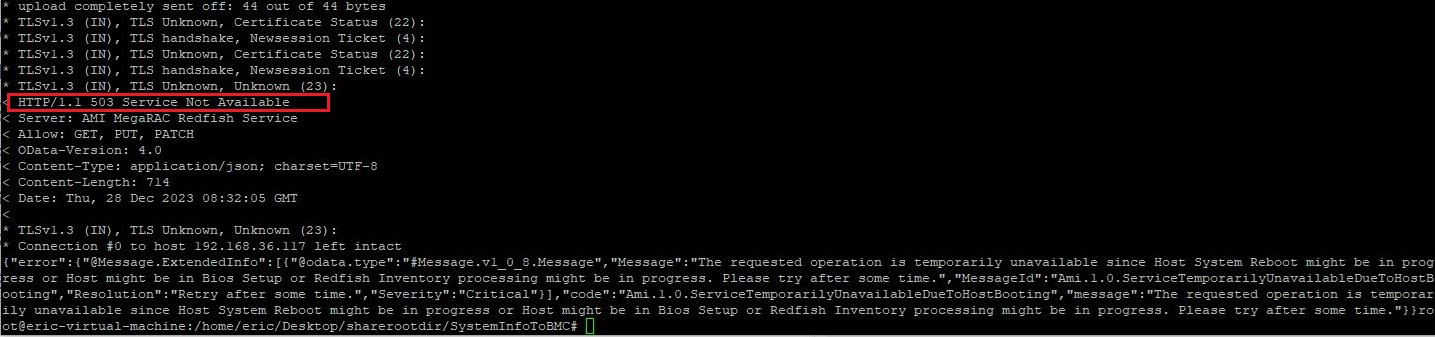
If an issue occurs during the update (e.g. the procedure did not start, or an error code "Status:500 Internal Server Error" occurred), you can try below methods such as the power actions or resetting BMC to default according to the scenarios:
i. Double checking your command:
If your cURL request was returned by an error code 400, it means that the request command was incorrect. In other words, the request sent by the client to the host server did NOT follow the rules. The client should modify the request command before retrying so that it could be understood by the host.

ii. Reboot Host:
If the expected update procedure does not start up, you may try powering off your system, or try rebooting it:
curl -k -v -X POST https://[BMC_IP]/redfish/v1/Systems/Self/Actions/ComputerSystem.Reset -d '{"ResetType" : "GracefulRestart"} -H "Content-Type: application/json" -H "X-Auth-Token: [token]"
ResetType Allowable values :
“On” for Host power on
“GracefulRestart” for Host reboot
“GracefulShutdown” for Host soft power off
“ForceOff” for Host hard power off
iii. BMC set to default:
If you encountered an error code 500 issue, this could be related to corrupted RedFish data. The overall solution is to resend a brand new copy of RedFish data to the server again. To do so, we flash BMC to the same version with items other than RedFish preserved, or simply update your BMC.
To preserve your current BMC config:
curl -k -v -X PATCH https:// [BMC_IP]/redfish/v1/UpdateService -d '{"Oem": {"AMIUpdateService": {"PreserveConfiguration": {"Authentication": true,"FRU": true,"IPMI": true,"KVM": true,"NTP": true,"Network": true,"REDFISH": false,"SDR": true,"SEL": true,"SNMP": true,"SSH": true,"Syslog": true,"WEB": true} } } }' -u [username]:[password] -H If-None-Match:W/\"1667287258\" -H "Expect:" -H "Content-Type: application/json"
5. Report an issue to us:
If there is an issue that cannot be resolved or further assistance is required, please visit https://event.asrockrack.com/tsd.asp and fill out the form as detailed as possible so we could provide an efficient tech support.
How to enable dual-screen on Ubuntu OS?
Preparation
The following guide will help you through enabling dual screen with your Ubuntu OS on your ASRock Rack product. This example would be based on the scenario of enabling dual-screen on a B650D4U system with Ubuntu 22.04.4. Before this procedure, the system is only capable of displaying video through the onboard VGA port but not the HDMI port simultaneously.
For detail and further resource, please refer to:
Radeon™ Software for Linux® Installation — amdgpu graphics and compute stack unknown-build documentation (amdgpu-install.readthedocs.io)
Steps
1. First, we install the AMDGPU driver: 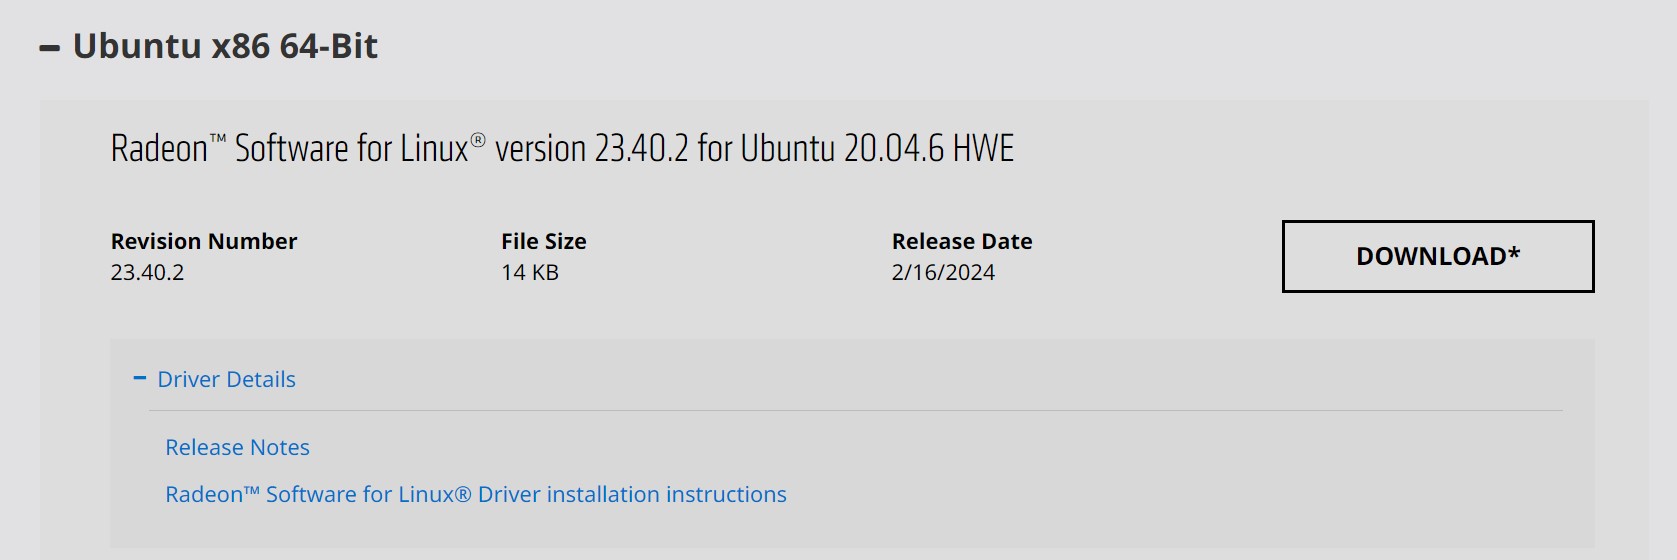
After that, run “sudo amdgpu-install -y --accept-eula” to finish installation:
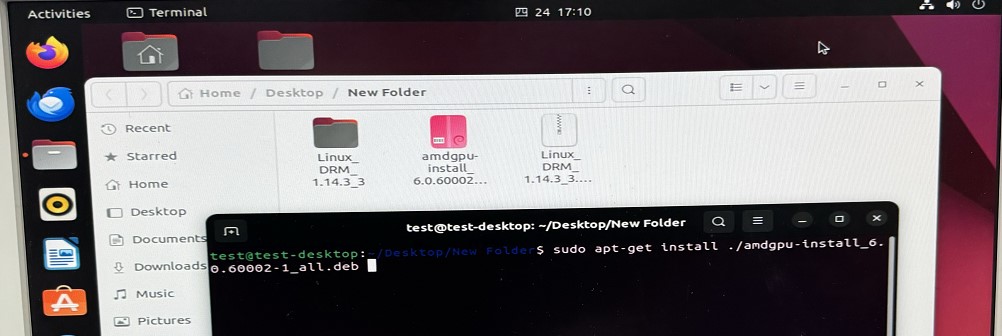
2. Then, proceed to install the ASPEED Graphics Driver:ASPEED - Drivers Download (aspeedtech.com)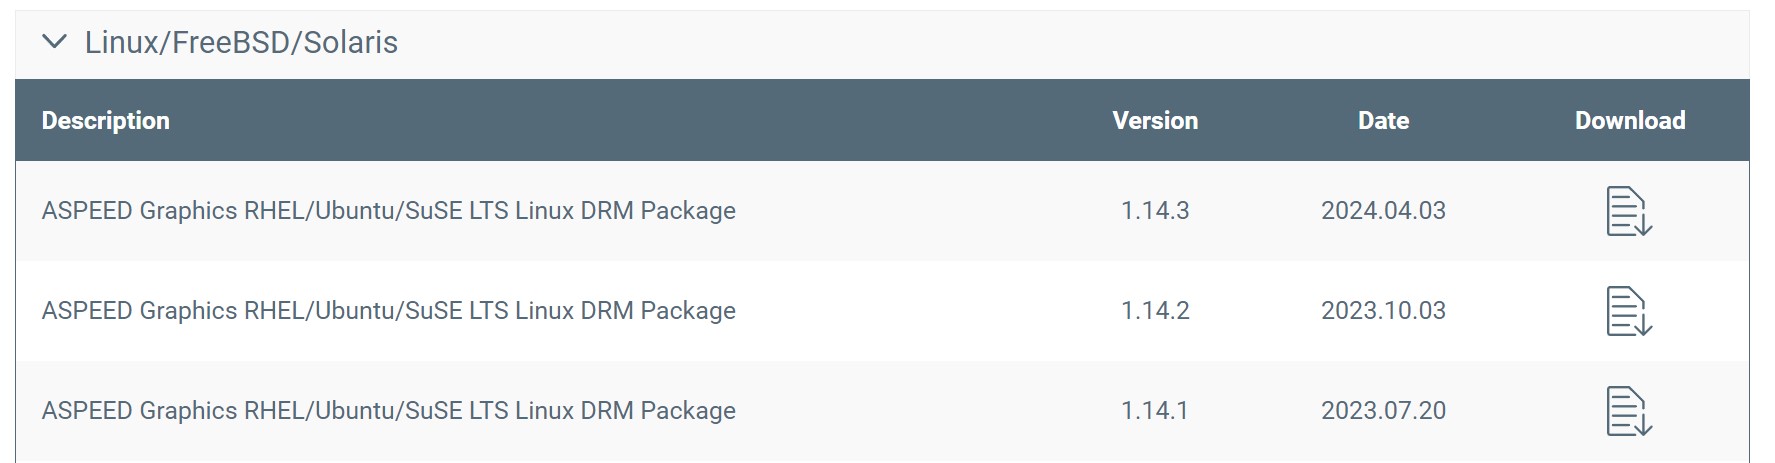
Download the package and direct into the DKMS folder. Then run “sudo dpkg -i ast-drm-linux6.2.deb” to install the latest Linux package.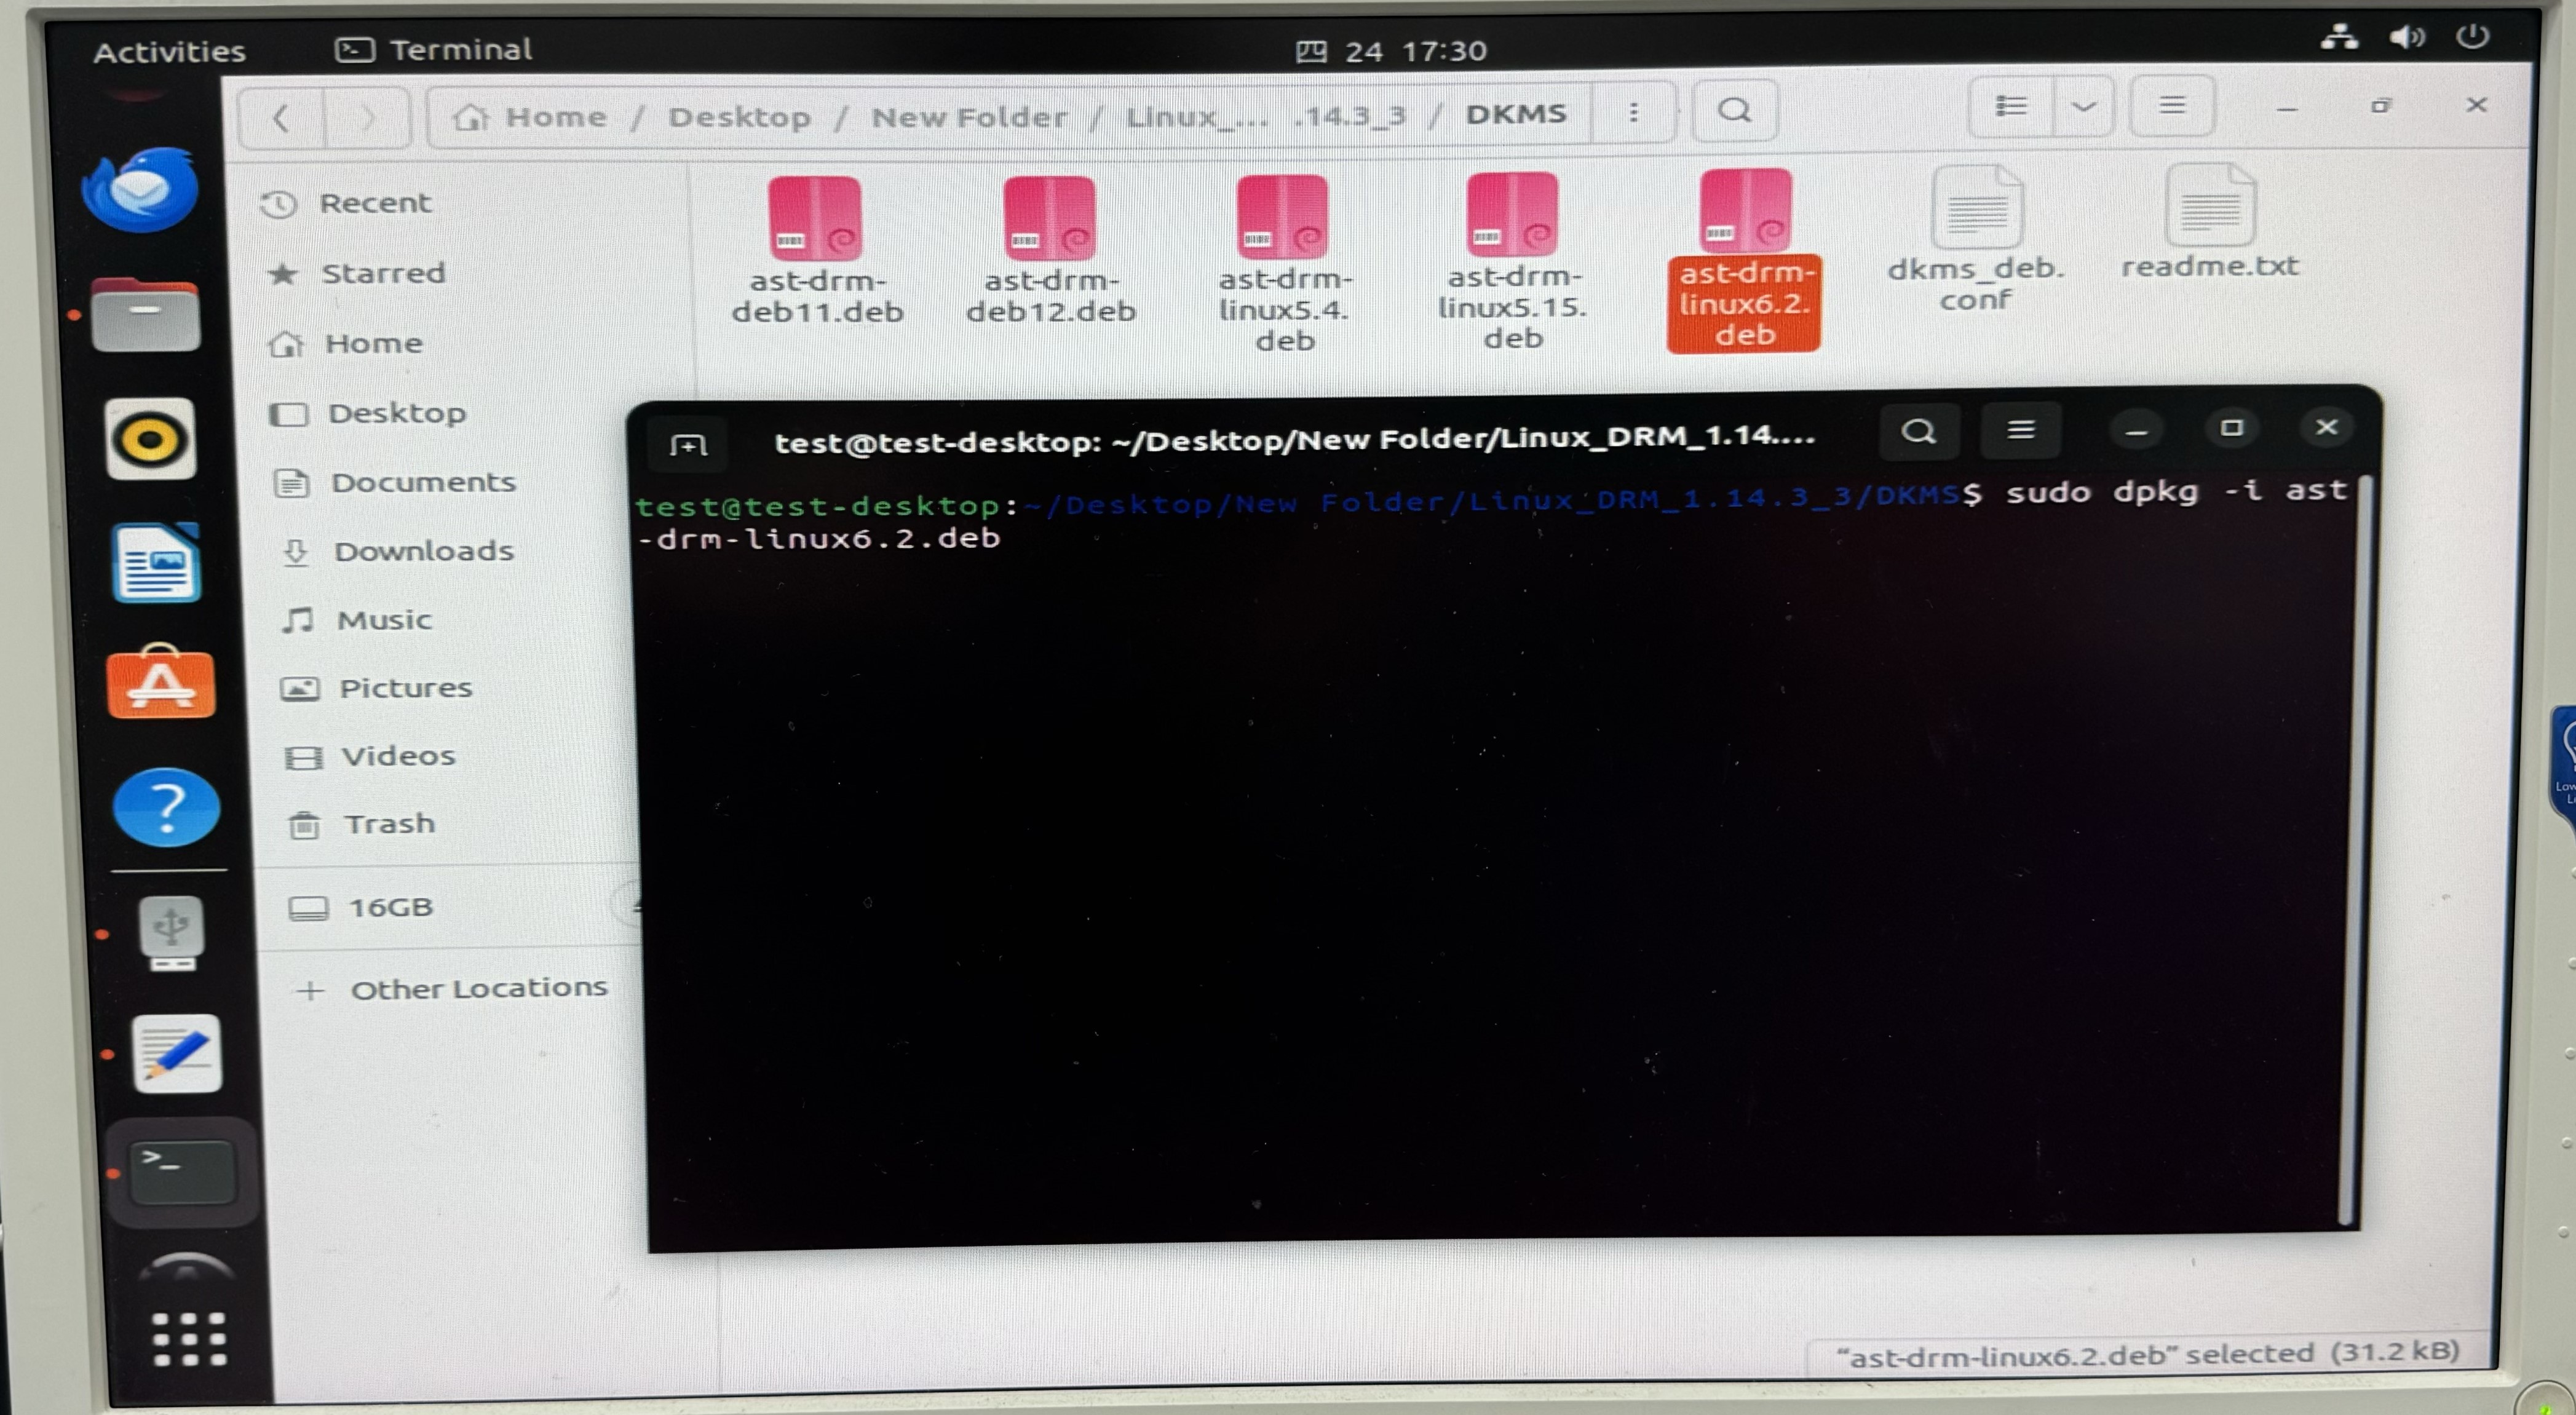
Completion: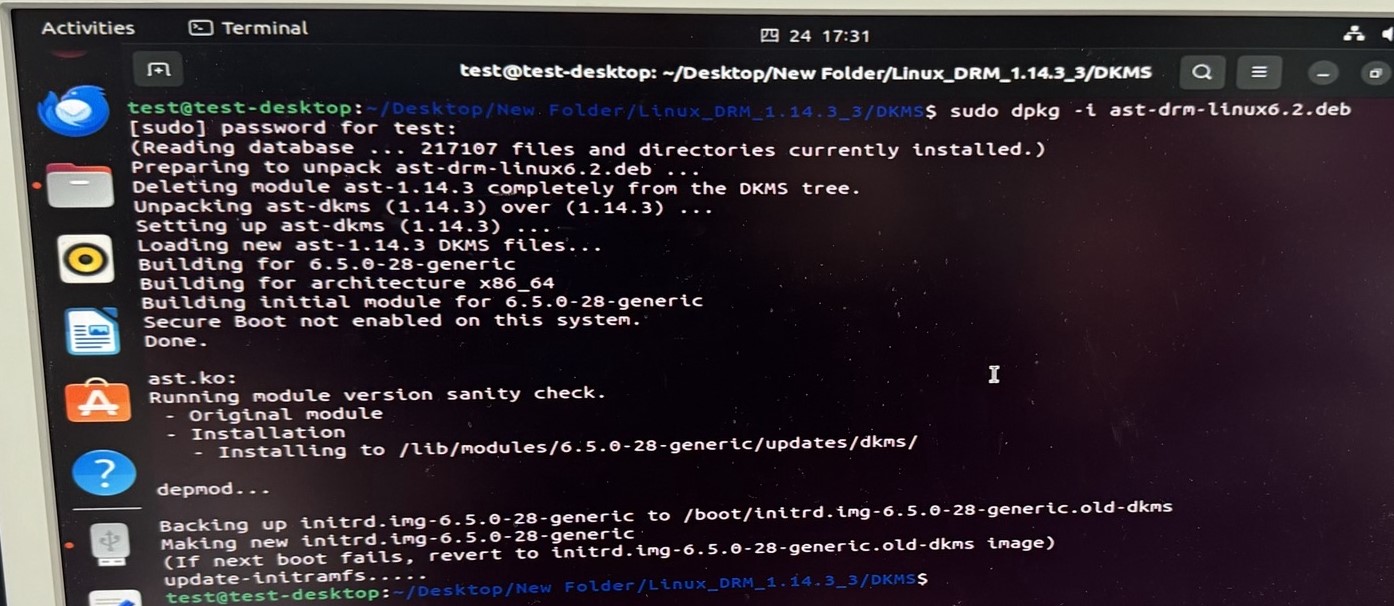
3. Finally, install LightDM display manager by running “sudo apt install lightdm”, and choose lightdm as your Default display manager: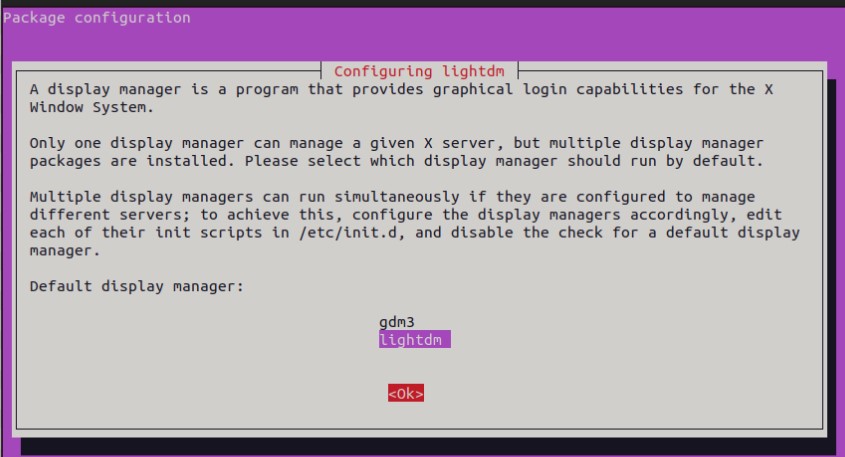
4. Reboot the system, and click on the Ubuntu LOGO and choose “Ubuntu on Wayland”.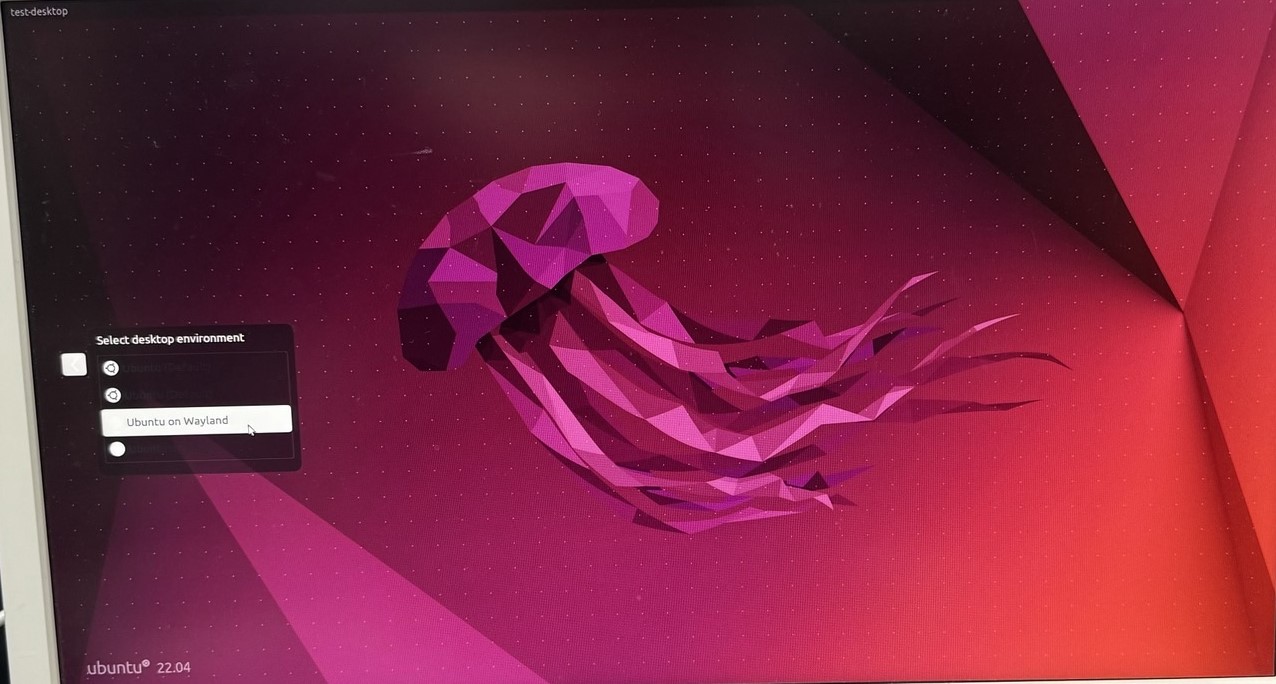
5. Upon login, you will notice that both the onboard VGA and the HDMI are now displaying video. Be advised that the HDMI output is restricted to only be used as a secondary monitor with the VGA output being the primary one.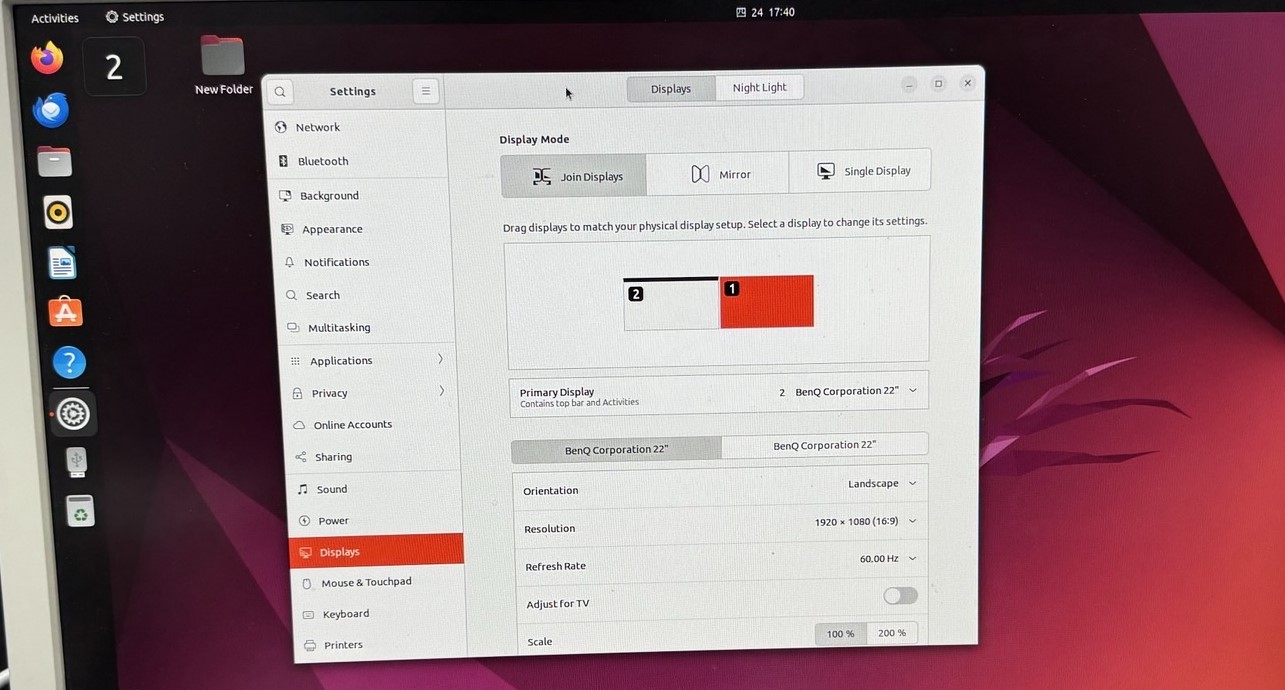
How to adjust fan speed for an Altra® product with IPMI commands?
Preparation
1. Make sure your Altra motherboard / system to adjust fan speed on has a well-functioning BMC, so it can later be configured with ipmitool commands.
2. All fans are properly powered and seated to the motherboard / system so there would not be any unexpected errors.
Also make sure that the fans do have 4-pin or more to support manual speed configuration.
Steps
1. Open up a Linux terminal, update system repositories and install ipmitool. Take Ubuntu for example, run “sudo apt update” and “sudo apt install ipmitool”.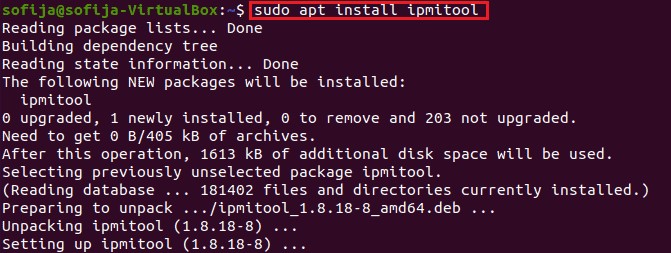
2. All the fans are set to act correspondingly to the CPU temperature by default. To manually configure them, here are some sample commands to apply your designated fan speed:
a. All fans run at full speed:
>> sudo ipmitool raw 0x3a 0x1 0x64 0x64 0x64 0x64 0x64 0x64 0x64 0x64
b. All fans run at half speed:
>> sudo ipmitool raw 0x3a 0x1 0x32 0x32 0x32 0x32 0x32 0x32 0x32 0x32
c. All fans set to default mode (operate based on CPU temperature):
>> sudo ipmitool raw 0x3a 0x1 0x0 0x0 0x0 0x0 0x0 0x0 0x0 0x0
*To set fan speed to a specific value, simply change the 0x64 or 0x32’s above to 0xHexValue. As 64 in hex equals to 100 in decimal, 32 in hex equals to 50. Similarly, apply the hex value of any % fan duty on your demand.
e.g. Use 0x50 for the fans to work at 80% speed.
3. To check if the fans are working correctly at the designated speed, check out the OpenBMC WebUI > Hardware status > Sensors, all the fans should be listed with their key information such as Current Speed value, Upper and Lower critical value, etc.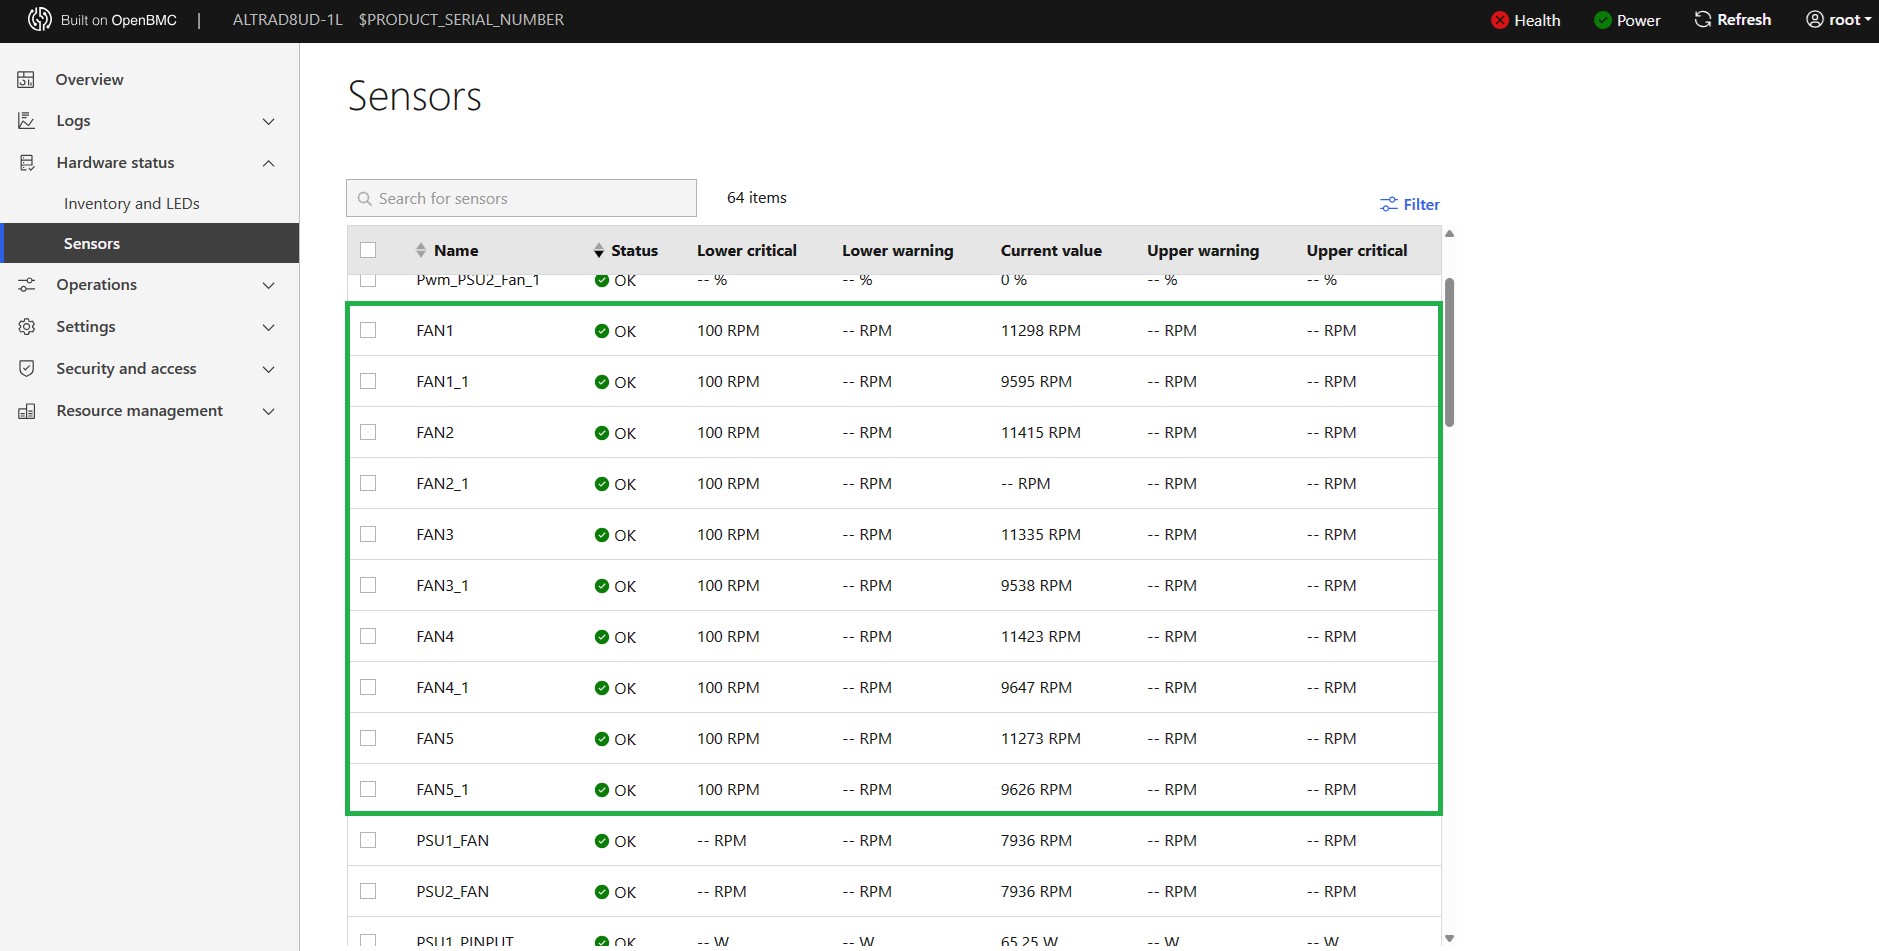
How to remotely monitor an Altra® (Ampere®) product boot process?
Here is an easy method to monitor the boot procedure for our ALTRA series motherboard and systems. Simply follow below steps to access the host system via SSH session remotely:
1. Run the ssh command below with the Host system IP at your command prompt on a client system to start an SSH session:
ssh root@<Host_BMC_IP> -p 2200
2. First time running the command, you may receive a return message which requires you to grant access. Simply enter “yes” to proceed.
3. Then enter your BMC password, the default password would be “0penBmc”.
4. After that, power on or reboot the host. Soon, you shall see the boot process begins updating rapidly in the window above.